15 Christmas Tree Decor Inspiration Ideas for a Magical Holiday Look
A Christmas tree is more than lights and ornaments—it’s the heart of your holiday story. Your tree can set the tone for the whole home, from classic red-and-green warmth to modern monochrome cool. This guide takes you from planning to the final sparkle with simple, clear steps. You’ll learn how to choose colors, place lights like a pro, style ribbon that actually behaves, and pick a look that matches your lifestyle. Whether you live in a studio or a busy family house, you’ll find ideas that fit your space, budget, and time. Let’s make your tree glow with personality and joy.
Check it : Holiday Magic Starts Here: 15 Stunning Christmas Kitchen Inspiration Ideas
Ribbon 101: Vertical Weave, Cascades, and Bows
Ribbon adds movement and polish. Choose wired ribbon 2–4 inches wide so it holds shape. Cut 18–24 inch pieces and tuck them in a zigzag for a “vertical weave.” For cascades, anchor the ribbon near the topper and let it fall in loose waves, tucking every 12 inches. Mix one pattern (like plaid) with one texture (velvet or satin) and one solid. Create bows with long tails near visual gaps—odd numbers look best. If ribbon fights you, cut shorter pieces; hidden pins or ornament hooks help anchor. Keep ribbon within your color story so the tree stays cohesive.
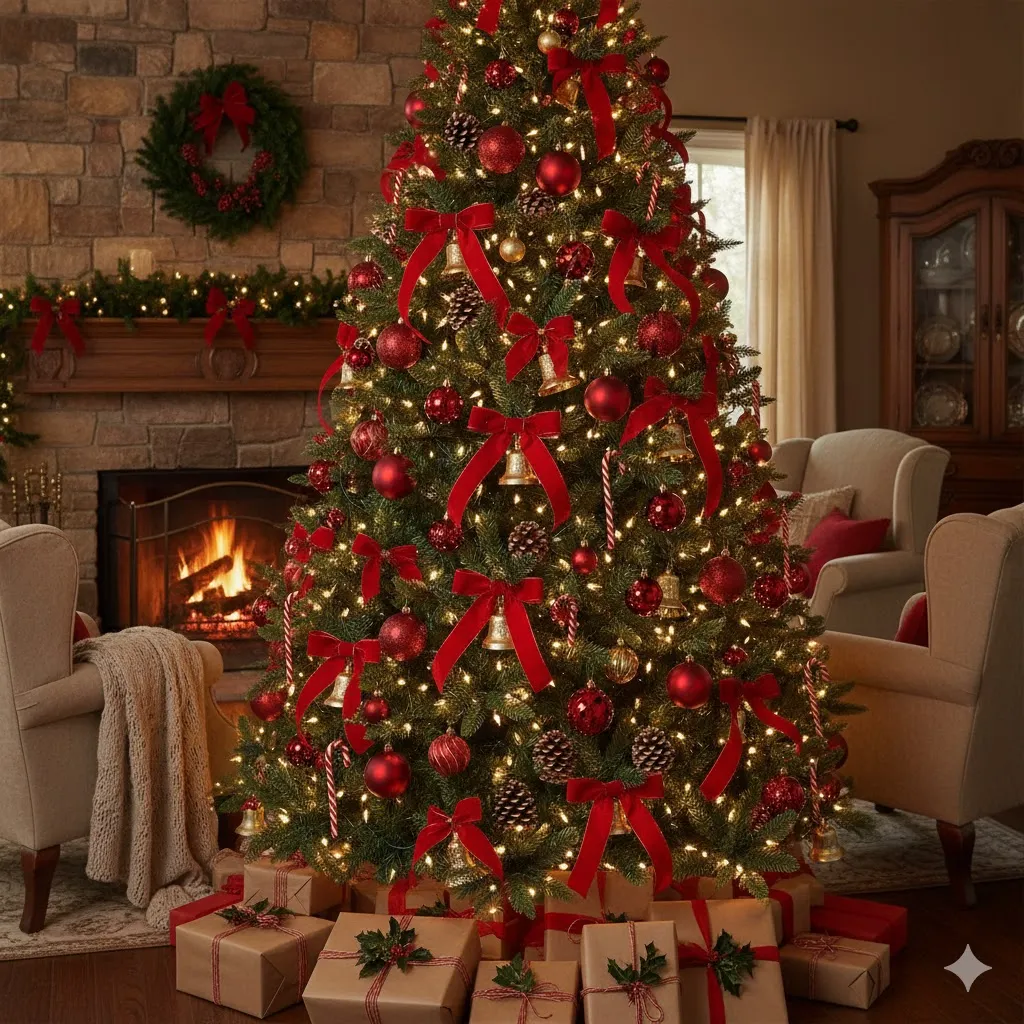
Idea 1 – Classic Red & Evergreen Tradition
This timeless look feels like a holiday movie. Use deep red ornaments, berry picks, and velvet ribbon against rich green branches. Mix matte and glossy finishes for contrast. Add gold touches with bells or frames for a warm glow. For charm, hang candy canes and small wooden toys. A star topper in brushed gold finishes the scene. Keep gift wrap in red, kraft paper, and gold twine to extend the palette under the tree. The beauty here is warmth and memory—choose a few heirlooms to anchor the story and fill the rest with simple shapes that repeat the red-green rhythm.
Idea 2 – Winter White & Champagne Glam
If you love soft, elegant shine, try whites and champagne. Think frosted ornaments, clear glass, and pearl garlands. Use a mix of white textures—feather, faux fur, linen—to avoid a flat look. Champagne ribbon brings gentle sparkle without the loudness of bright gold. Add a few crystal drops near lights to catch reflections. A big, layered bow topper in champagne and white feels couture. Keep the tree skirt simple and plush, like faux fur. This style photographs beautifully and makes evenings feel like a quiet snowfall indoors—calm, luxe, and welcoming.

Idea 3 – Scandinavian Minimal with Natural Wood
Scandi style is serene and airy. Keep the palette to whites, soft grays, and natural wood. Choose simple ornaments: wooden stars, paper snowflakes, and clear glass balls. Use a thin linen ribbon or leather cord for hangs. Instead of heavy garland, drape a single strand of warm micro-lights. A plain wooden bead garland adds texture without clutter. For the base, use a woven basket collar. This look relies on space and light, so resist overfilling. The result is peaceful and modern, perfect for small apartments or anyone who craves a calm, uncluttered holiday mood.

Idea 4 – Rustic Farmhouse with Burlap & Bells
Country comfort never goes out of style. Start with burlap or ticking-stripe ribbon and add metal bells, pinecones, and mini lantern ornaments. Mix in galvanized metal accents and wooden signs for a farmhouse feel. Choose warm white lights and maybe a second strand with soft twinkle to mimic candlelight. A plaid tree skirt anchors everything. Finish with a jute rope garland or bead strands. This look is hardy and family-friendly, great for busy homes. It’s forgiving too: textures hide gaps, and natural materials age beautifully through the season.

Idea 5 – Modern Monochrome Black & White
Chic and graphic, black-and-white feels like a city window display. Use matte black ornaments, glossy white balls, and striped or gingham ribbon. Add a few clear glass pieces to lighten the look. Keep shapes bold and simple—spheres, stars, and large snowflakes. A black velvet bow topper or a white 3D star completes the modern edge. Match gift wrap with black paper, white ribbon, and simple tags. When you limit color, balance matters: distribute black evenly from top to bottom so the tree doesn’t feel heavy on one side.

Idea 6 – Candy Cane Sweet Shop
Playful and bright, this theme delights kids and guests. Combine red, white, and a touch of pink. Hang candy-cane ornaments, faux peppermint swirls, lollipop picks, and sprinkle-covered baubles. Use striped ribbon in different widths for a whimsical rhythm. Add a “Hot Cocoa” sign or mini gingerbread houses as ornaments. A red tree skirt or a white faux-fur base keeps it neat. This style is pure fun—perfect for kitchens, playrooms, or anywhere you want instant smiles.

Idea 7 – Woodland Forest with Pinecones & Critters
Bring the outdoors inside with earthy greens, browns, and soft neutrals. Use pinecone ornaments, twig stars, and felt animals like foxes, owls, or deer. Add preserved moss balls and wooden bead garlands for texture. Choose ribbon in olive velvet or linen. Tuck in a few faux mushroom ornaments and cedar picks for a forest-floor look. A burlap skirt or wood-slice base completes the scene. The key is layers of natural texture—everything should feel like it came from a winter walk.

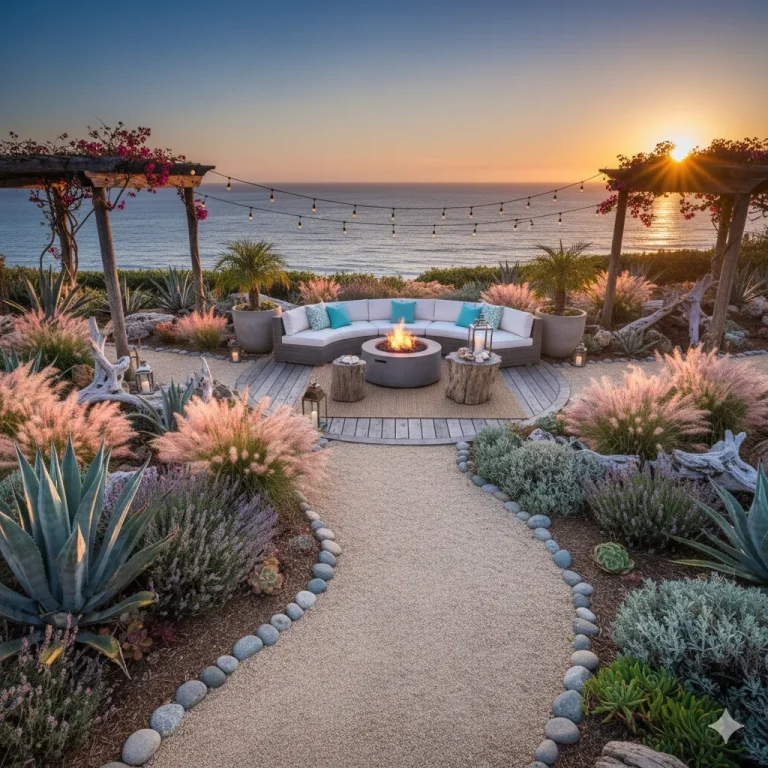
Idea 8 – Coastal Noel in Seafoam & Shells
If your heart lives by the water, try a calm coastal tree. Choose soft seafoam, sandy beige, and white. Hang shell and starfish ornaments, glass floats, and rope details. Use airy gauze ribbon or linen to keep things light. Clear lights reflect beautifully on glass and pearl finishes. Add driftwood stars and a simple white coral topper. Keep the base natural with a woven seagrass basket. The feel is breezy and fresh, bringing a beach sunrise into your winter living room.

Idea 9 – Jewel-Tone Luxury (Emerald, Ruby, Sapphire)
Jewel tones give drama and richness. Choose two bold colors and ground them with gold. Emerald velvet ribbon against deep green branches is stunning, then add ruby and sapphire ornaments for spark. Use larger ornaments to match the bold palette—oversized balls, faceted gems, and glass finials. A gold crown or star topper adds regal finish. Mirror ornaments bounce the light for extra depth. Keep gift wrap in solid jewel papers with satin ribbons to keep the look refined, not busy.

Idea 10 – Vintage Nostalgia with Heirloom Ornaments
Honor family stories with a vintage tree. Mix heirloom ornaments with retro glass baubles, tinsel garlands, and clip-on candles (use LED for safety). Choose ribbon that looks aged—velvet, lace, or faded satin. Hang ornaments by year or memory clusters: travel, babies, celebrations. A classic angel topper or tin star ties it together. This tree grows richer over time, and every piece is a conversation starter. Keep the lights warm and gentle to flatter old glass and delicate finishes.

Idea 11 – Kid-Friendly Tree with DIY Crafts
Let little hands help. Use shatterproof ornaments, felt shapes, paper chains, and pom-poms. Set a lower “kid zone” where they can hang their work proudly. Choose bright colors and simple ribbon. Add photo-frame ornaments so your tree holds this year’s memories. For a topper, try a big handmade star covered in glitter or stickers. Keep a bin of spare hooks and a soft stool nearby so kids can rehang pieces without stress. This tree becomes a yearly creative project and a memory maker you’ll treasure.

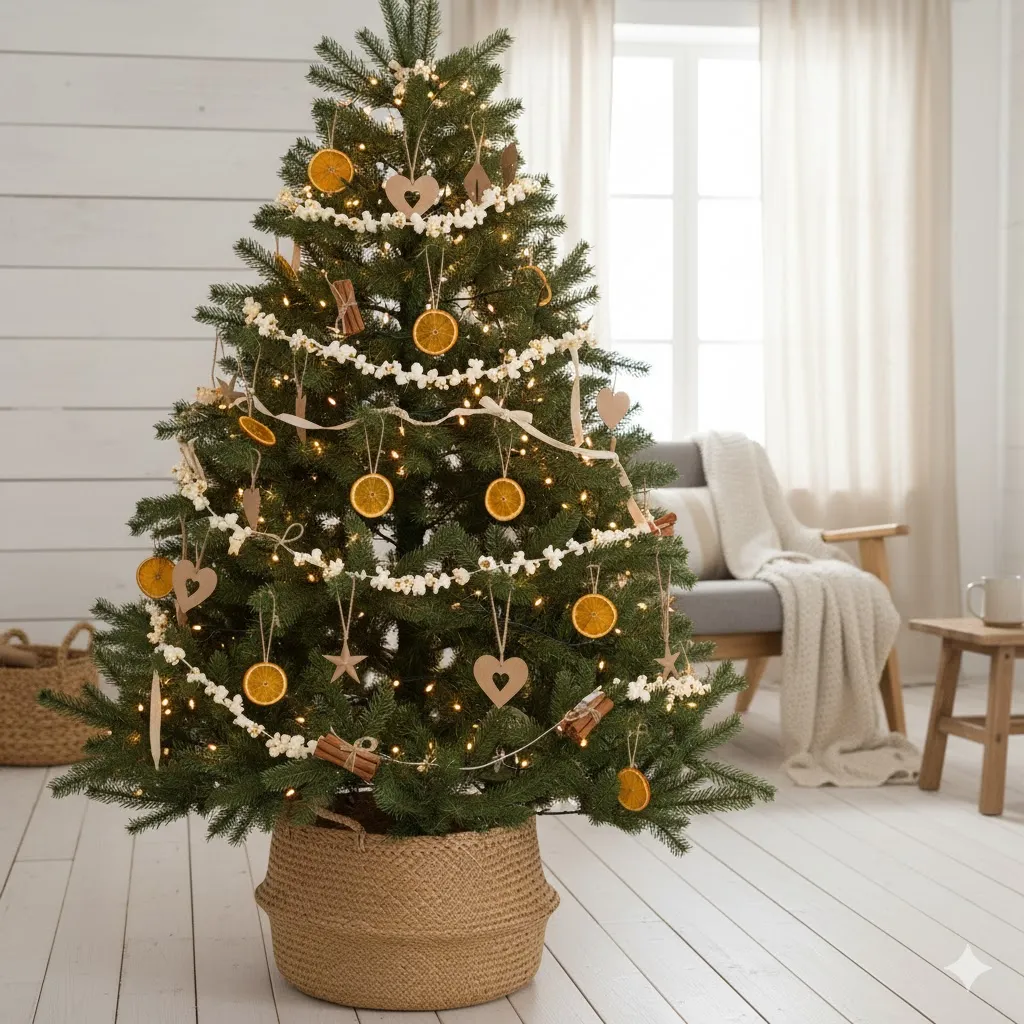
Idea 12 – Sustainable & Low-Waste Natural Tree
Go green without losing sparkle. Use dried orange slices, cinnamon sticks, popcorn-and-cranberry garlands, and paper ornaments. Choose cotton or linen ribbon that you’ll reuse. Skip single-use plastic and pick wood, glass, or metal that lasts. Collect pinecones and twigs from nature walks and bake them low to dry before use. Store everything carefully for next year. The result feels warm, smells amazing, and keeps waste minimal. It’s beauty with a conscience—and it looks timeless in any room.
Idea 13 – Small-Space Slim Tree or Wall Tree
Tiny room? No problem. Choose a slim or pencil tree to save floor space. Place it in a corner near a mirror to double the sparkle. Use smaller ornaments and shorter ribbon pieces so proportions stay balanced. If floor space is zero, make a wall tree: arrange garland in a triangle shape, add lights, and hang lightweight ornaments. Keep the palette tight so the display looks intentional. A mini tree on a stool or console can also create a sweet focal point without crowding the room.

Idea 14 – Themed Topper Statements (Stars, Bows, Words)
The topper crowns the story. Classic stars work with almost any style—pick brushed metal for tradition or acrylic for modern shine. Oversized bows feel luxe; layer two ribbons (one pattern, one solid) for depth and let tails cascade. Word toppers like “Joy” or “Noel” add a graphic touch and photograph well. For nature themes, try a cluster of picks: cedar, berries, and bells arranged like a bouquet. Keep scale in check: the topper should be bold but not so heavy it tilts the tree.

Idea 15 – Scent, Sound, and Surroundings to Finish the Magic
A magical tree isn’t only visual. Add gentle holiday scent with stovetop citrus and clove or a light pine candle across the room (never under branches). Play soft playlists—acoustic carols or jazz—so the tree feels alive without noise. Style the surrounding area: wrap gifts in your palette, place a basket of blankets by the tree, and hang matching stockings if nearby. Add a mirror, lanterns, or a twinkling garland on the console to extend the glow. These small touches make the tree feel like part of a full holiday scene.

Styling Mistakes to Avoid (and Easy Fixes)
Common issues include crowding the front while ignoring the back, using too many clashing colors, or stopping ribbon halfway because it won’t behave. Fixes are simple: step back every few minutes, spread color and texture evenly, and cut ribbon into shorter, tucker-friendly pieces. If lights look patchy, add a final spiral pass. If the tree feels flat, add picks—berries, branches, or sparkly sprays—to create depth. Keep ornament sizes mixed: large near the center, medium across the body, small at tips. These quick tweaks turn “okay” into “wow.”
Overcrowding, Scale Issues, and Uneven Color
Overcrowding makes a tree feel heavy. If branches sag, remove a few large ornaments and replace with lighter pieces. Scale matters: huge ornaments on a slim tree overwhelm; tiny ones on a tall tree get lost. Uneven color shows up in photos—too much red on one side, too much metallic on another. Break the tree into four visual zones and balance each zone with a similar mix of colors and sizes. Use a simple rule: for every large ornament, place two medium and three small nearby. This helps the eye read harmony, not chaos.
10-Minute Tree Rescue Checklist
First, switch the lights on and step back six feet. Fill dark spots with a short string or reweave a section. Second, fluff obvious gaps; bend branches to meet ornaments rather than moving everything. Third, add three ribbon pieces near the top, middle, and bottom to pull the eye down. Fourth, balance color—move one bold ornament from crowded areas to an empty zone. Fifth, reset the topper and smooth tails. In just ten minutes, your tree will look planned and polished again, ready for guests and photos without a full redo.
Conclusion
A magical holiday tree comes from clear vision, simple color choices, and a few smart techniques. Fluff deeply, layer lights, and let ribbon guide the eye. Then pick the idea that speaks to your home—classic, glam, Scandi, rustic, modern, kid-friendly, or green—and repeat the palette from top to gifts. Add scent, sound, and a cozy scene around the tree to complete the story. With these steps, your tree won’t just look good—it will feel like the warm center of the season, welcoming you home every night of December.
FAQs
Q1: How many lights do I need for my tree?
A helpful guide is 100 lights per foot of tree height for soft glow, up to 200 per foot for a brighter, showy look. Layer from trunk to tips for depth.
Q2: What ribbon width works best?
Wired ribbon between 2–4 inches is ideal. Use 2–2.5 inches for slim trees and 3–4 inches for fuller trees. Short pieces tuck easier than long strands.
Q3: How can I make a small tree look fuller?
Fluff well, push larger ornaments deeper into branches, use picks to fill gaps, and choose a tight color palette. A basket collar and coordinated gifts add volume visually.
Q4: What’s the easiest topper to style?
A layered bow is beginner-friendly and adjustable. Use two ribbons (pattern + solid), wire the center, and let long tails cascade to connect the top with the base.
Q5: How do I keep the tree pet- and kid-safe?
Place breakable ornaments higher, use shatterproof below, secure the tree stand, and avoid edible decor within reach. Keep cords tidy and choose flameless candles nearby.